

You have finished the research, typed the final concluding thought, and now comes the part everyone dreads: making the document actually look right. For many first-time researchers, applying layout rules feels like a massive hurdle at the end of a long marathon. Staring at a dense wall of text on your screen can easily spark panic when a deadline is looming. What do you consider about espaçamento abnt.
According to standard university grading rubrics, anywhere from 15 to 20 percent of your overall academic grade often depends entirely on meeting formal visual guidelines. This happens because a clean, predictable layout has a powerful psychological impact on tired professors. Reviewers read dozens of documents a week, and submitting a well-organized file builds immediate academic credibility while helping you avoid instant rejection.
Picture a perfectly framed photograph where wide, clean borders naturally guide your eyes straight to the subject matter. That exact visual framing is what standardized document framing does for your written ideas. Before you ever touch a ruler or a software menu, realize that these margins and gaps simply provide breathing room so your text does not look crowded or overwhelming.
Behind this professional appearance is NBR 14724, the primary document that defines how a paper should be presented in Brazil. Instead of viewing these academic formatting standards as a bureaucratic nightmare, think of them as a universal map for your reader. Because everyone uses the same layout structure, your brilliant ideas about history or biology take center stage rather than your font choices.
Mastering proper ABNT spacing ultimately boils down to controlling three core areas on your page. You need to adjust the outer margins to leave room for physical binding, set the everyday line gaps so paragraphs are easy to read, and create distinct visual breaks for long quotes. This simple trio transforms a chaotic draft into a polished manuscript.
Translating these official guidelines into everyday software actions takes only a few minutes once you grasp the basic logic. Bypassing the heavy, legalistic jargon allows a pure focus on the practical steps needed to get your paper ready for submission. Your document is about to transform from a stressful draft into a clean, grading-ready masterpiece.
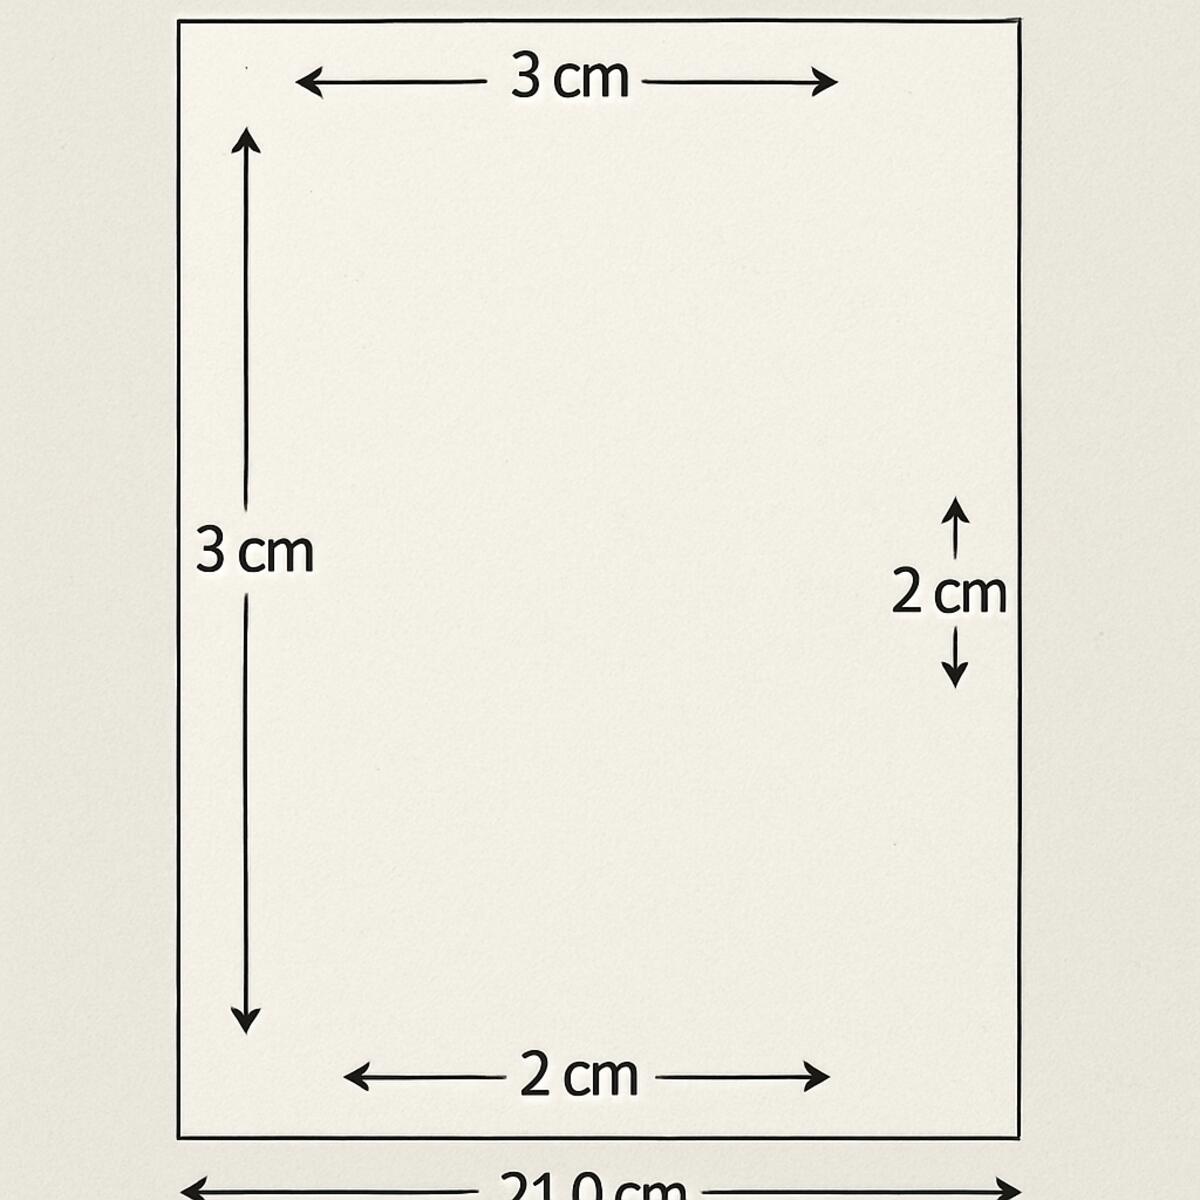
The 3-3-2-2 Rule: Setting Up Your Page Borders to Avoid Binding Disasters
Imagine your printed paper as a framed photograph. Before typing a single word, you need to build that frame to protect your work. Many students rely on default software settings, only to discover later that the start of their sentences disappears into a spiral binding. To prevent this physical formatting disaster, ABNT uses the “3-3-2-2 rule” to build a natural binding allowance—often called a gutter margin—directly into your digital document layout.
Applying this specific framework ensures your project completely aligns with NBR 14724, without forcing you to decode complex standard manuals. Whether you use Microsoft Word, LibreOffice, or Google Docs, simply open your page setup menu and enter these standard margins for university thesis writing:
- Top Margin: 3 cm (leaves dedicated room for your page numbers)
- Left Margin: 3 cm (creates the crucial binding allowance)
- Bottom Margin: 2 cm
- Right Margin: 2 cm
By making these left and top margin measurements wider than the opposite sides, you guarantee that your professor can comfortably read every single word after the pages are physically stapled or bound together. With your page frame securely constructed, the next focus is the text itself.
Mastering the 1.5 Line Spacing: Providing Your Ideas with Professional ‘Breathing Room’
Have you ever looked at a dense page and immediately felt tired? That happens when words are crammed together, which significantly reduces reading speed and causes eye strain. In formatting, this vertical space is called entrelinha (line spacing), and controlling it correctly makes your research highly approachable rather than visually overwhelming.
To solve this visual crowding, standard rules dictate a “Goldilocks” zone for your main body text. You need exactly 1.5 line spacing for your standard paragraphs. This specific ABNT spacing gives your ideas professional breathing room, allowing your evaluator to easily track from the end of one line to the beginning of the next without losing their place.
Applying this setting requires using your word processor properly rather than relying on manual keyboard tricks. A frequent mistake beginners make is pressing the “Enter” key twice to force visual gaps between lines, which completely breaks the document’s layout when text is added or deleted later. Instead, setting 1.5 line spacing in Word or Google Docs takes just seconds through the paragraph formatting toolbar, establishing a stable, automatic style for your entire project.
This simple software adjustment instantly transforms a chaotic draft into a clean, professional manuscript. Consistently applying the 1.5 rule is a fundamental step toward improving document readability. Now that your sentences have sufficient room to breathe vertically, you need to show your reader exactly where new thoughts begin.
The 1.25cm Paragraph Indent: Guiding the Reader Through Your Argument
Think of the first-line indent as a visual stepping stone. That small empty space at the start of a line instantly communicates that a fresh point in your argument is beginning. Without this subtle cue, even properly spaced text can still look like an intimidating wall of words.
Setting up this structural flow is simple. The standard rule for ABNT format requires exactly a 1.25cm gap before the first word of every standard paragraph. A common pitfall is mashing the spacebar until it looks right, which ultimately creates jagged, uneven edges. Instead, configuring your word processor’s ruler ensures the ‘Tab’ key jumps exactly 1.25cm every single time. By adjusting paragraph indentation for monographs automatically, you save hours of tedious formatting and guarantee a perfectly aligned document.
These consistent visual cues keep evaluators focused entirely on your research rather than structural errors. Remember that this 1.25cm indent applies strictly to the first line of regular text. Extended sections borrowed from other authors require a completely different layout to show the narrative voice has changed.
Handling Long Block Quotes: When and How to Use the 4cm Recuo
Borrowing another author’s exact words strengthens academic arguments, but cramming massive quotes into your regular paragraphs disrupts the reading flow. Whenever a copied passage exceeds three lines in your document, standard ABNT formatting requires an immediate layout change. Instead of burying these lengthy excerpts in your main text, you must create a visual break—a dedicated block that distinctly separates your analytical voice from the source material.

Dropping quotation marks is the surprisingly simple first step for this new layout. Under NBR 10520 citation guidelines, the physical placement of the text entirely replaces the need for punctuation to indicate borrowed words. By shifting the text block to the right, you give the external voice its own clear stage, making it instantly recognizable to anyone grading your work.
Formatting these indented block quotes for long citations requires a quick adjustment of specific settings in your word processor. Here is the exact combination you need to apply to that specific block of text:
- Indent (Recuo): Set the left margin to exactly 4cm using the ruler tool.
- Spacing: Change from the standard 1.5 spacing to single line spacing.
- Alignment: Keep the text fully justified, matching your main body.
- Font: Reduce the text to font size 10 (or 11, so long as it is smaller than your main text).
Mastering this physical shift ensures your research looks polished and organized without overwhelming your reader. However, shrinking your quote introduces the broader concept of baseline scale across your entire document.
Sizing Your Text: Why Font 12 Isn’t Always the Answer
Setting everything to font size 12 might seem like the easiest fix, but it actually flattens your document’s visual map. While size 12 is the universal standard for body text, using it everywhere confuses the reader’s eye. Think of text size as a volume dial: your main arguments should speak loudly at size 12, while supporting details only need to whisper. This visual hierarchy gracefully guides your evaluator through the page, separating your core analysis from secondary information without extra effort.
A smaller font establishes this necessary contrast. According to standard font sizes for academic documents, any element breaking away from the primary narrative must scale down to size 10. This drop in scale doesn’t alter your basic text alignment, which always remains fully justified to keep your margins crisp. You must apply this smaller text specifically to:
- Long block quotes exceeding three lines
- Footnotes positioned at the bottom of the page
- Captions describing figures, charts, or images
- Source data located inside or beneath tables
By properly scaling these components, you meet legibility standards for small print while ensuring your own writing remains the star. Once text sizes are firmly locked in, controlling the remaining structural gaps between sections creates a clean skeleton for your paper.
Header Spacing and White Space: Creating a Clean Skeleton for Your Paper
Just as text size separates primary and secondary ideas, the empty space on your page signals when a new topic begins. Think of vertical white space as a visual palate cleanser. Crowding your paragraphs together makes the reading experience feel overwhelming and dense. Standard layout rules for research dissertations emphasize that actively managing these empty gaps creates a clean structural skeleton, letting your evaluator’s eyes rest before diving into the next argument.
Nailing the white space requirements for section headings is straightforward using the “Two Enters” rule. Whenever you insert a new chapter title or subtitle, you need exactly one blank line above and below it. Assuming your document uses the standard 1.5 line spacing we established earlier, merely pressing your “Enter” or “Return” key twice after the previous paragraph builds this perfect buffer. This frames your headings beautifully so they never bleed into the surrounding body text.
Controlling these structural shifts also prevents the dreaded “orphaned” header. If a beautifully spaced section title ends up stranded alone at the bottom of a page without its accompanying text, insert a manual page break to push it to the next sheet. Keeping your headings securely anchored to their paragraphs guarantees a professional presentation, perfectly setting the stage for handling specialized formatting at the base of the page.
Footnote Formatting: Keeping the ‘Small Print’ Clean and Readable
Sliding extra information to the bottom of your page can quickly eat up valuable real estate if left unchecked. When formatting explanatory notes, the goal is to provide necessary context without distracting the reader from your main argument. ABNT standards handle this visual boundary using a simple footnote separator—a short, continuous horizontal line that automatically tells the eye where the primary text ends and the supplementary details begin.
Shrinking the physical footprint of these notes ensures your core ideas remain the star of the show. Unlike the generous 1.5 breathing room of your body text, footnotes demand single line spacing. You will also pair this tighter spacing with the smaller size 10 font. Compressing these details keeps the bottom of your page tidy and prevents lengthy citations from dominating the sheet.
Finalizing this polished look requires paying close attention to your text alignment. Just like your main paragraphs, footnote text must be justified so that the words stretch evenly between the left and right margins, creating clean, flush edges. Getting these subtle layout details right proves you have mastered the internal structure, perfectly setting the stage for the document’s academic first impression.
Cover Pages and Vertical Alignment: The Art of the ‘Academic First Impression’
Crafting a strong first impression matters just as much as the meticulous details tucked away in your footnotes. When a reader opens your document, the cover page acts as an academic handshake, making proper vertical alignment for cover pages crucial for setting a professional tone. You can easily build this layout yourself without relying on clunky, unpredictable templates by simply understanding how ABNT format naturally distributes text across the page.
Balancing this blank canvas correctly requires visualizing the sheet in distinct horizontal zones. The top margin securely holds your institution and your name, perfectly centered. Moving down, your main title takes the absolute physical center of the page. Pushing these elements apart evenly with standard paragraph breaks creates a harmonious, uncrowded spread that instantly looks official.
Just beneath your title lies a unique element called the “natureza do trabalho,” or the nature of the work. This brief explanatory text—stating whether the paper is a thesis, dissertation, or final class project—demands a very specific visual treatment. Rather than sitting centered like the rest of the text, this block must be justified and indented precisely to the middle of the right half of the page, using tight single line spacing to distinguish it from the broader title above.
Anchoring the entire layout are your city and year, resting neatly at the very bottom margin. Mastering this crisp vertical spacing ensures your title page looks impeccably clean, providing the perfect gateway before tackling internal elements like tables and illustrations.
Tables and Illustrations: Spacing Rules for Visual Data
Visual data often breaks the clean rhythm of a paper if placed haphazardly. When you insert a chart or a photograph into your document, the goal is clarity rather than creating visual clutter. Formatting standards treat every illustration or table like a neatly assembled sandwich, ensuring your reader knows exactly what they are looking at and where the data originated, all without disrupting the surrounding paragraphs.
To build this layout correctly, you must abandon the standard 1.5 ABNT spacing momentarily and rely on a tighter framework. Every visual element follows a strict three-part structure:
- The Top (Title): Place the label (e.g., “Figure 1 – Sales Growth”) directly above the image, using single line spacing and a smaller font size 10.
- The Middle (Graphic): Insert your chart, photograph, or table centered perfectly on the page.
- The Bottom (Source citation): Directly below the image, state where the data came from using the exact same single spacing and size 10 font.
Squeezing these descriptive labels tightly against the graphic clearly separates the visual data from your main text. Keeping this metadata compact ensures your ideas flow smoothly around the illustration. Once you understand how to nestle these visuals neatly within your margins, it is time to map out the entire document through page numbering logic.
Page Numbering Logic: Why Page One Isn’t Always Page One
Setting up page numbers often feels like wrestling with your word processor. The confusion usually stems from understanding the difference between pre-textual pages, like your abstract, and the textual content that begins with your introduction. Think of your document as having a silent counter ticking in the background. According to ABNT standards, the physical page count actually begins on your title page, but those early digits must remain entirely hidden from the reader’s view.
To master this invisible-to-visible transition, you must insert a “section break” right before your introduction. This simple software trick separates the continuous document count from your displayed numbers. Once you divide the file into these two distinct zones, you can command your program to reveal the digits starting exactly where your main text begins. The page numbering rules for scientific reports dictate that these numbers must sit in the top right-hand corner, two centimeters from the edges, following NBR 14724 guidelines.
A perfectly positioned first number gives your thesis an undeniable polish. Readers can navigate your arguments easily, while your preliminary pages stay beautifully clean and uncluttered. With the core document mapped out and the visible numbers ticking upward exactly where they belong, formatting the bibliography is the final step.
The Reference List: Single Spacing and the ‘Blank Line’ Divider
Reaching the end of your paper brings a surprising shift in formatting. Throughout your chapters, you likely kept the text perfectly justified, creating block-like edges. However, the reference list demands strict left-alignment. If you try to justify a page full of long URLs, your word processor will stretch the text horizontally, creating awkward, gaping white spaces. Left-aligning prevents this visual clutter.
Once you fix the alignment, adjust the “breathing room” between lines. While your main text uses 1.5 spacing, bibliographies shrink down to single spacing. To keep your sources from blurring into an unreadable wall of text, simply insert one blank single-spaced line between each entry. When setting up automatic bibliographical references, double-checking these specific adjustments ensures your final page perfectly supports your earlier work governed by NBR 10520 citation guidelines.
Before calling your project complete, use this quick checklist to guarantee your final pages meet the required standards:
- Alignment: Left-aligned to avoid awkward word stretching.
- Internal Spacing: Single-spaced lines within each individual reference.
- Entry Separation: One blank, single-spaced line between distinct sources.
Mastering these domestic standards is a great milestone, but professor requests for international rules introduce new complexities.
ABNT vs APA: Why You Can’t Just ‘Guess’ the Formatting
Opening up a new document often tempts you to click one of the pre-made academic templates, but this is a dangerous shortcut. Most word processors default to the American Psychological Association (APA) style, which is the global heavy-hitter for scientific journals. However, Brazilian universities require ABNT because it provides a unified national system that standardizes everything from engineering reports to history papers, keeping domestic research visually consistent.
Relying on those foreign templates creates a common formatting trap known as “standard blending.” If you overlook ABNT vs APA formatting style differences, your paper will instantly look wrong to your grading committee. For example, the standard margins for university thesis work in Brazil demand the 3-3-2-2 Rule (top and left 3cm, bottom and right 2cm) to allow room for physical binding. APA simply uses flat one-inch margins everywhere.
Even when you intentionally apply these domestic rules, your software might still secretly enforce its international defaults behind the scenes. You might set up your 1.5 line spacing perfectly, only to notice weird, inconsistent gaps between certain paragraphs. Before assuming a misunderstanding of the manual, check how the program handles automatic text wrapping to troubleshoot ‘phantom space’ issues.
Troubleshooting the ‘Phantom Space’: Fixing Common Word Processing Errors
Have you ever hit “Enter” to start a new paragraph and noticed the gap looks suspiciously large? This invisible hurdle is what we call “phantom spacing.” While you might already know how to set 1.5 line spacing in Word, default templates often sneakily apply an extra measurement—calculated in points (pt)—after every paragraph. Because your body text must flow continuously with standard 1.5 breathing room, any automatic “8 pt” or “10 pt” jump instantly throws off your document’s compliance.
To detect and eliminate these hidden gaps, you need to dig slightly deeper into your software’s layout menu. Whether you are typing in Microsoft Word or Google Docs, the fix requires a quick sweep of your paragraph settings:
- Select your entire document using Ctrl+A.
- Open the “Paragraph” or “Line & Paragraph Spacing” menu.
- Locate the “Spacing Before and After” section.
- Change both the “Before” and “After” values to exactly 0 pt.
- Uncheck “Add space between paragraphs of the same style” if the box appears.
Clearing out these hidden point values acts as a master reset, perfectly normalizing spacing across different copied-and-pasted text blocks. Once your document is free of software-induced gaps, you can trust that every line naturally aligns with proper ABNT format. With the invisible formatting traps finally removed, a final pre-submission review ensures total compliance.
Your Final ABNT Spacing Checklist: The 10-Minute Pre-Submission Review
Instead of fighting with your word processor, you can intentionally design a document where every centimeter serves a purpose, guiding your reader’s eyes effortlessly through your work.
To lock in this skill, conduct a systematic final review of your document formatting before you click submit or send it to the printer. The most efficient action plan is to work from the outside in. Check your overall page boundaries first, then adjust the main body text, and finally, hunt down the specific exceptions.
Use this Quick-Reference Checklist as your test to submit papers with confidence in their formal quality:
- The Canvas (Margins): Are they set to the 3-3-2-2 rule (3cm top and left, 2cm bottom and right) to prevent the binding from hiding your words?
- The Heart (Line Spacing): Is the main text breathing comfortably with the standard 1.5 rule?
- The Finish (Indents): Does every new paragraph start with a standard 1.25cm indentation?
- The Exceptions (Quotes): Are long quotes (more than three lines) visually separated, indented 4cm, and single-spaced?
- The Details (Numbers): Are page numbers, footnotes, and image captions correctly sized and single-spaced?
If you spot a section that looks suspiciously crowded or misaligned, you can fix common last-minute errors efficiently by verifying your ABNT spacing for that specific paragraph. Mastering the format ensures your professors or peers never get distracted by erratic borders or dense, suffocating text.
Start with your current project and take ten minutes to apply these checklist items right now to verify your layout. You no longer have to dread technical rules; instead, you can treat them as the silent, invisible frame that allows your hard-earned ideas to finally take center stage.